Category: vibration motor

BI2 – building a silicone sex toy

Now let’s build the first ESP8266 vibrator. I use the reliable design from this blog post and the new BI2 board. The new BI2 board can be controlled from any smart phone or computer.

As the BI2 board is round there is no need to build a case for the PCB and the LiPo. The easist way is to glue the battery directly on the ESP8266. Connect the battery and one or more vibration motors with the BI2 board.


The form consists of two parts which are fastened together with tinker wire. Before you have to insert the board with the vibration motor(s) and the battery. Therefore I used a handle. The handle could be put on top of the form. Then fix a USB connector to the handle. Plug in the BI2 board. Fasten the second half of the form.

Very important: The USB micro connector on the board must be protected from the silicone. When silicone flow between USB plug and connector it will be impossible to pull out the plug. I use wax to seal the USB micro connector. Read more here.


Now pour in the silicone, wait for some hours. And open softely the form.


Remove the overhanging silicone.

Here ist the Link to Tinkercad where you can edit the form and download STL files for your 3D printer: Download from Tinkercad: formhandle. Download ready to print zipped STL files.

Now build YOUR personal sex toy. Here you find the code for the ESP8266 as well as an IOT server application for quantifying your sex and remote control.

BI2: ESP8266 Vibrator Development Board – becoming colourful

The second version of the development board – I will call it BI2 from now on –  has some improvements:

  • I used more components of the original design (Adafruit Feather Huzzah) instead of comparable (and cheaper) Seeedstudio Open Part Library components. The reason for this is easy. The Adafruit design is reliable and approved. No need for designing your own circuits, no risk to fail. (But also no fun in inventing new circuits.)
  • I added LED light – the WS2812B – which is a  colourful LED (16 Mill. colours). They are commonly known as Adafruit Neopixel – a strip or a ring of individual programmable LEDs.
  • The diameter is smaller the first version.
  • It can drive three motors. (When you use the LED then only two motors can be driven.)

Here are some impressions of the board:


As you can see I had to wire the LED by hand. The reason for this is that I used GPIO16 which does not work at all. So I wired the LED to GPIO0 which can be used for testing only. The only free GPIOs are 12, 13 and 14.


Basic Node for the Internet of Sex Toys (part 1)

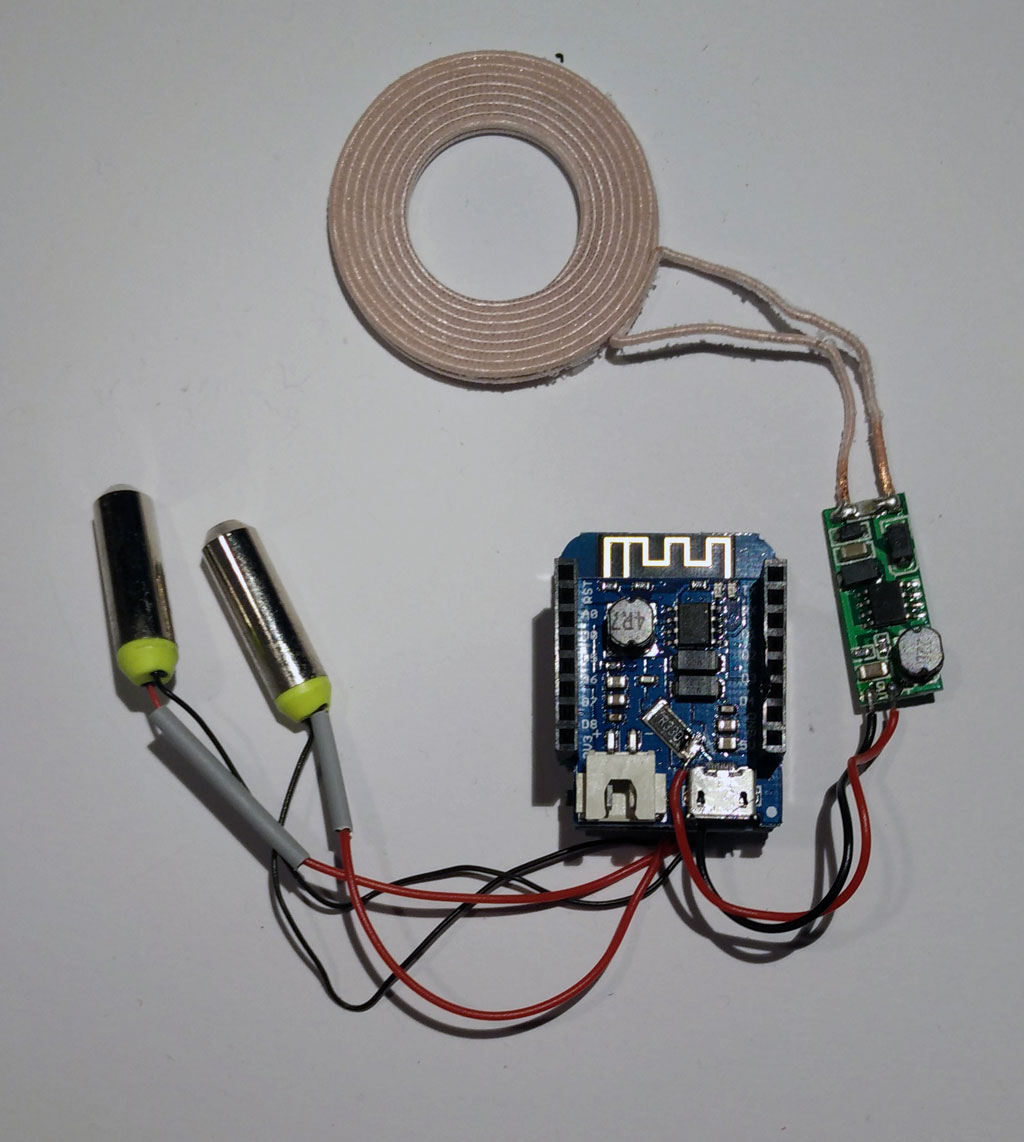
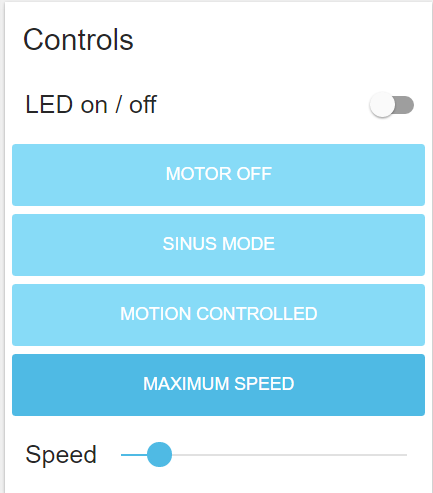
Wemos mini modules: ESP8266, motor driver and battery charging (in the middle); Wireless charging module (right side); wireless charging coil (top side); encapsulated vibration motors (left side)

In previous posts we showed how to build a vibrating sex toy in principle as part of the Internet of Things (IOT). In addition we have selected a hardware platform – the popular ESP8266 – for controlling a vibrator motor, gathering motion data and connecting to the internet. Now we want to build the toy itself.

part 1: Basic Node for the Internet of Sex Toys

part 2: Molding the Basic Node

part 3: Software for the Basic Node

Brief Review of development boards

There are a lot of development boards which are equipped with the ESP8266. The popular NodeMCU was already introduced here. Here is a quick overview and comparison:

NodeMCU

  • plus: very popular, cheap, USB connector for programming
  • minus: quite large (for being part of a sex toy), no support for battery charging

Adafruit Feather Huzaah ESP

  • plus: USB connector for programming and battery charging, smart form factor (only 23 mm wide), very good support (libraries, tutorials)
  • minus: quite expensive

WeMos D1 mini (pro)

  • plus: very cheap, USB connector for programming, additional stackable modules (eg. battery charging, TFT screens, motor driver), good form factor
  • minus: no real support (but there is a forum, problems with modules reported

ESP8285 (variant of the ESP8266)

  • plus: really small (!!!) and smart form factor, USB programming and battery charging, optional sensors on board (but no motion sensors)
  • minus: quite expensive, only 1MB memory (nevertheless enough for a lot of application)

For our project we selected the WeMos mini cause we get almost everything we need:

  • USB connector for programming
  • module for battery charging
  • module for a motor driver
  • good form factor (eg. to be put in a vibrator handle or in the base of a dildo)
  • cheap, fast delivery

But there is no shield for motion detection (accelerometer,gyroscope). So we have to use an additional board eg equipped with the MPU9250.

But there is a problem with the WeMos motor shield: After a few seconds it stopped working. And in addition the MPU9250 stopped working, too. Hours and hours we tried different configurations, changed the libraries … The problem was the motor driver shield itself. Fortunately there is an easy work around. Read here.

Another issue is the battery shield. It has an extra USB connector for charging the battery. So you have two USB connectors (one for battery charging and one for uploading). Two USB connectors are not handy. Fortunately we can do without the USB connector for uploading as it is possible to update the software over the air (OTA) using WiFi.

Material

As the body interaction philosophy uses motion for controlling the device we have to add the MPU. Again we use the MPU9250 which has an accelerometer, gyroscope and magnetometer.

Another insight was that you need at least a switch for rebooting. As we want to mold everything the switch must meet the IP67 requirements, which means it is water- (and silicone) proof. If you don’t want to mold the electronics you can use the RESET button on the WeMos mini board.

A perfect basic node has a wireless charging option, too.

Material list for the basic node:

  • Wemos mini board
  • Wemos motor driver shield
  • Wemos battery shield
  • Wemos prototyping board
  • Wemos set of pins
  • LiPo battery (eg. 3,7V 650mAh, 2C, JST plug, available at ebay)
  • MPU 9250 board (for motion control)
  • 1 or 2 encapsulated vibration motors, 3V, available at Alibabaexpress
  • Optional: Switch IP 67 protected (eg. Cherry Switches DC1C-K8AA IP67) – for molding
  • Optional: Wireless charging receiver 5V eg from Seeed Studio

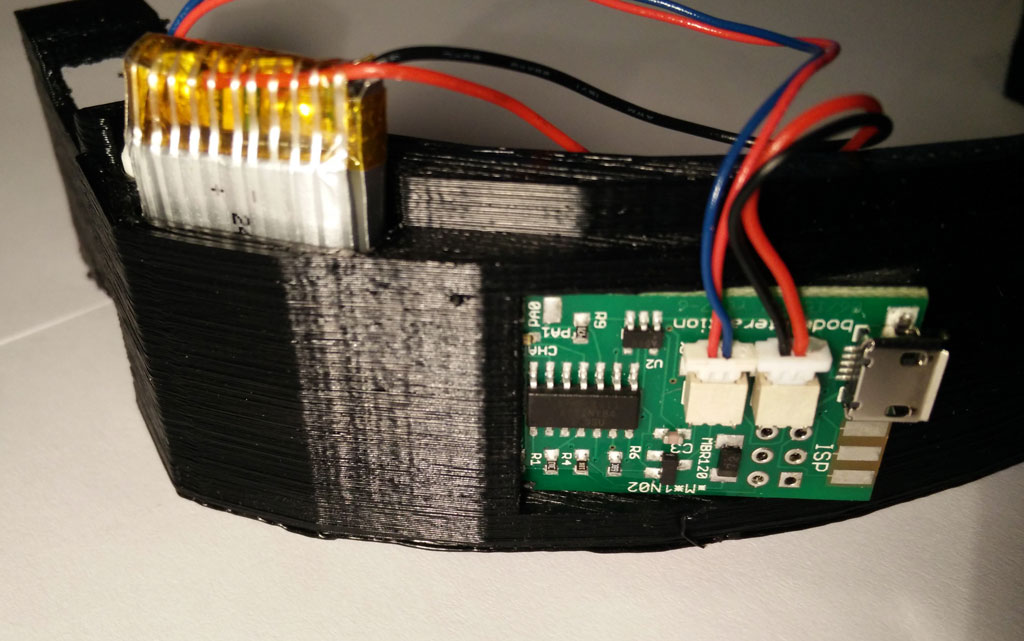
Material: battery shield, Wemos mini ESP8266, motor shield, MCU9250 (first row), LiPo battery, switch, vibration motor (second row)


Soldering the basic node

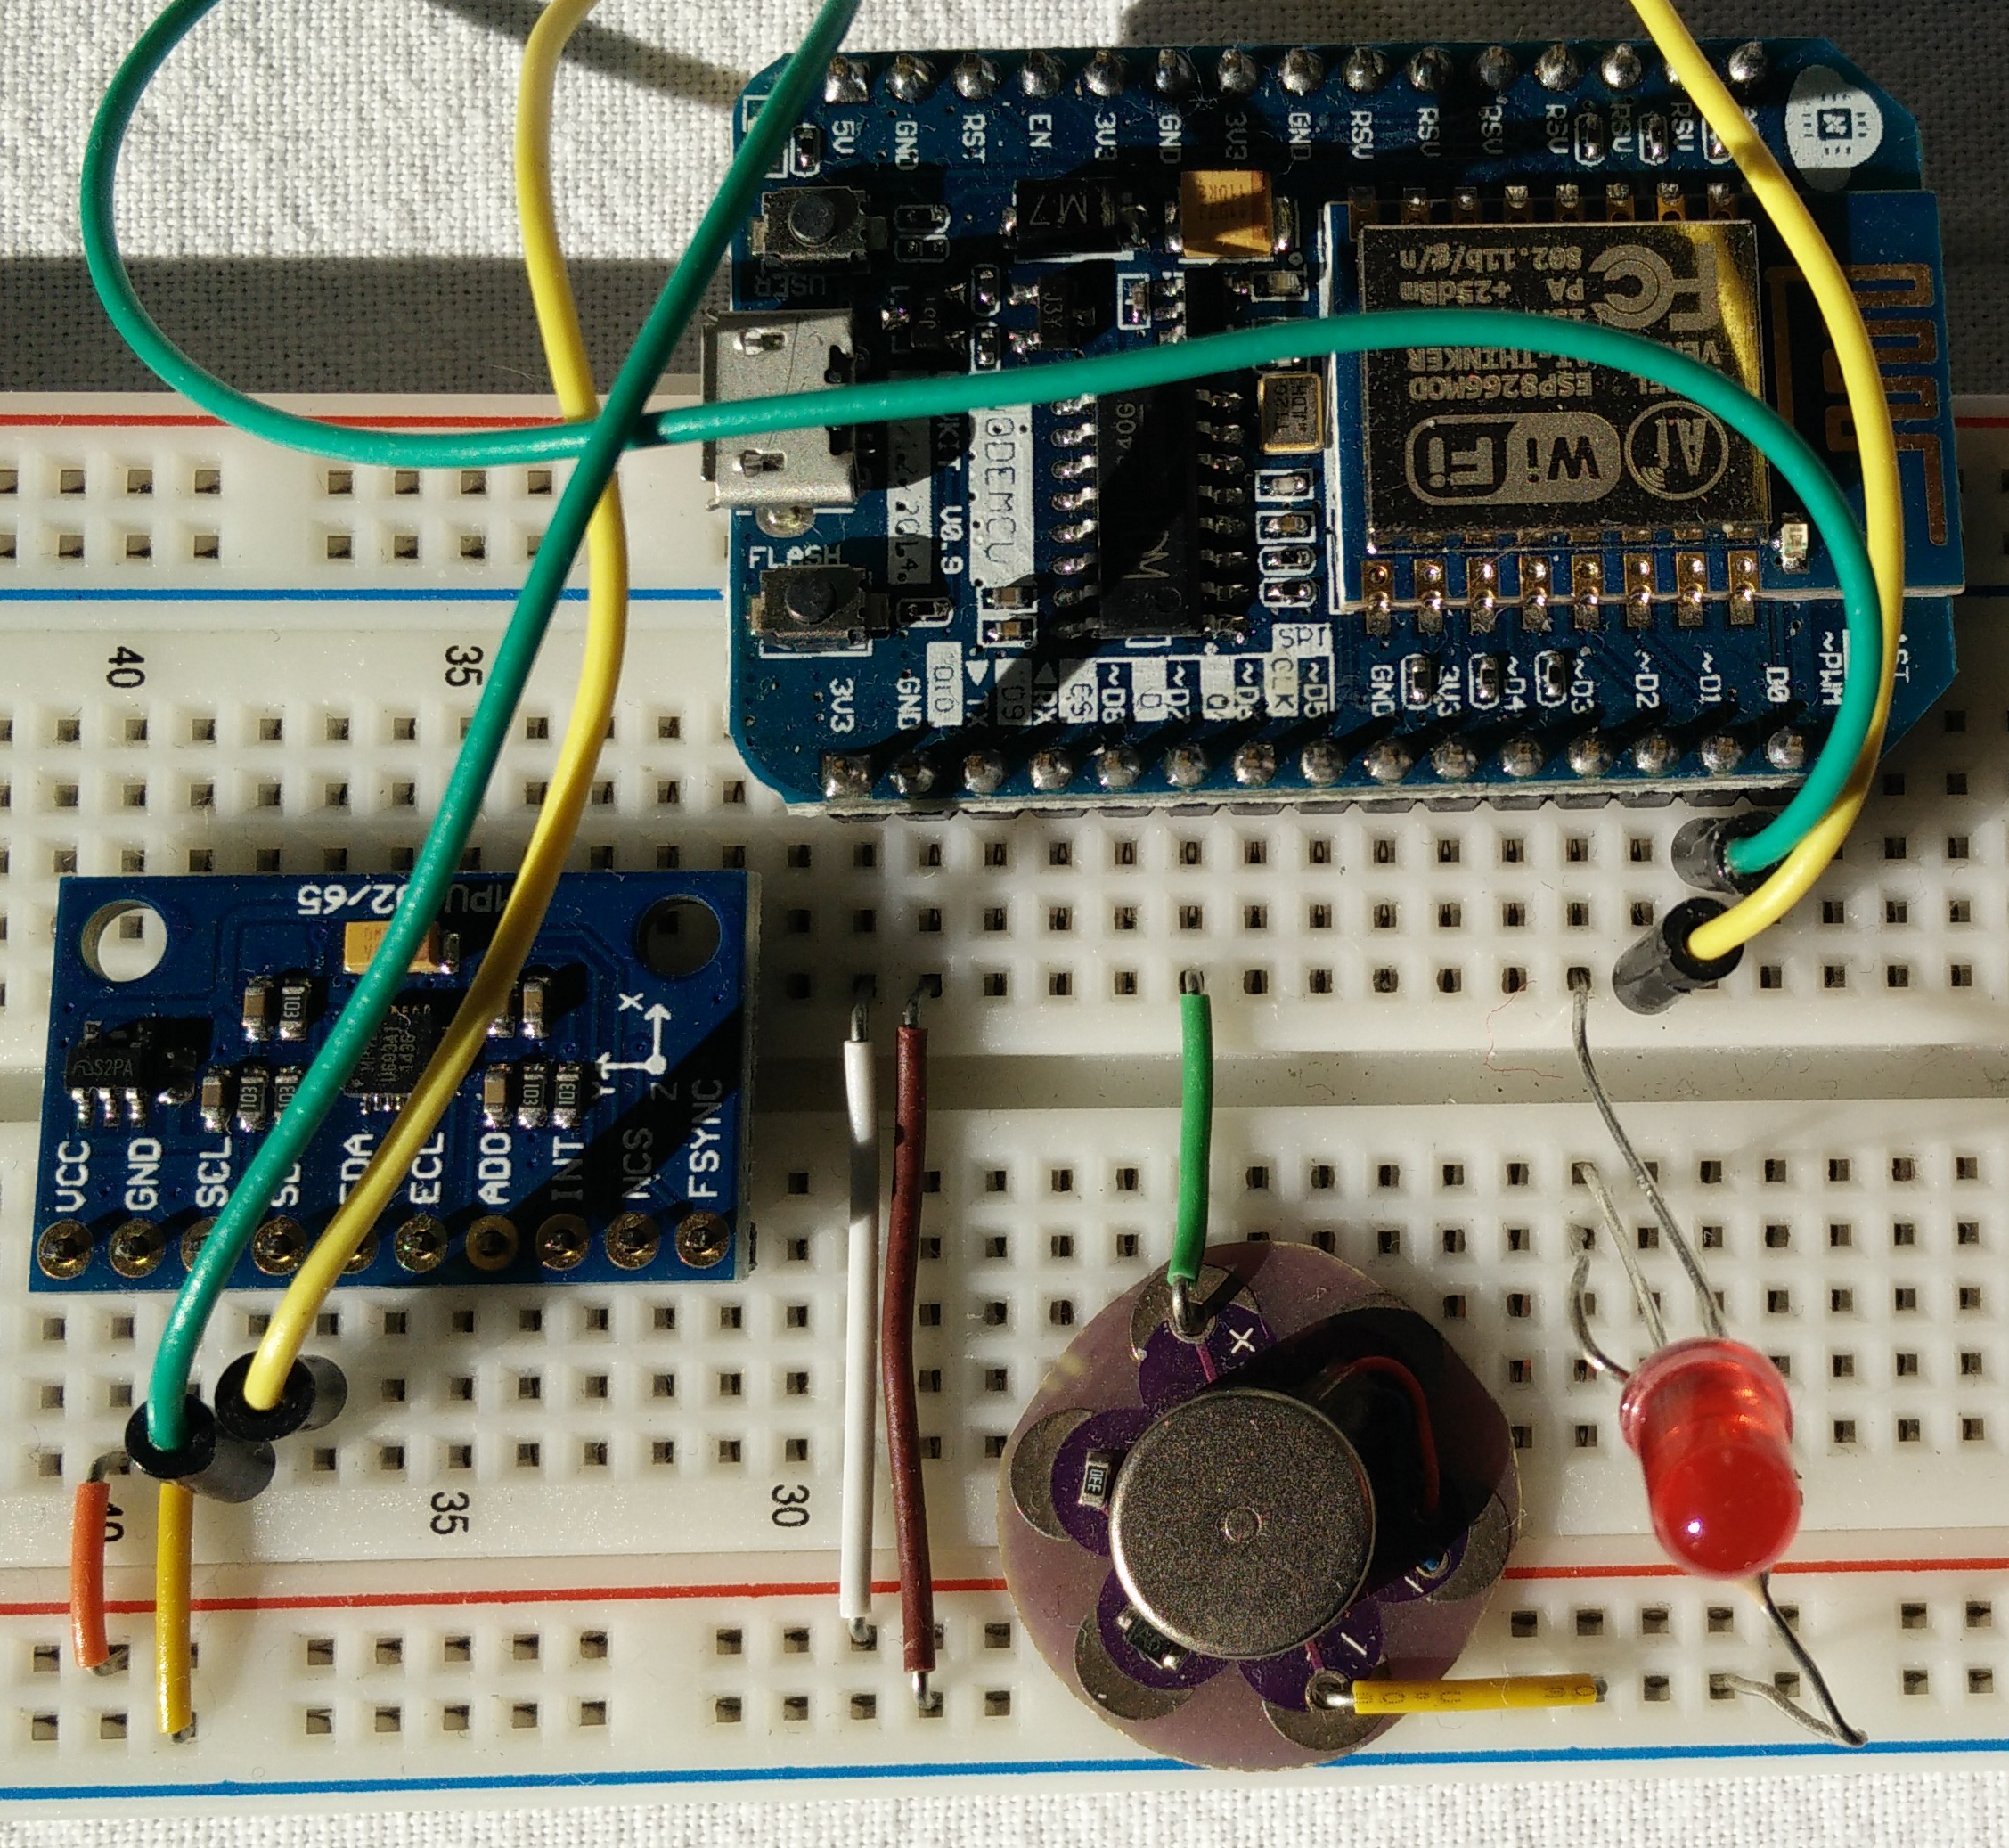
We use one connector (part of the Wemos set of pins) to connect the Wemos mini with the battery shield and the motor shield. This is done to save space. If your application has enough space you would use one connector for every shield.

Battery shield, Wemos mini ESP 8266, motor shield (from top to bottom)

Now have a look at the bottom side where the motor shield should be. We can connect up to 2 motors. Solder motor 1 to A1 and A2. Motor 2 has to be soldered to B1 and B2. In addition we need input power for the motor. We just use the 5V provided by the Wemos mini battery shield. Connect 5V to VM and GND (from the pins) and GND. But you could use other (more powerful) power sources, too.

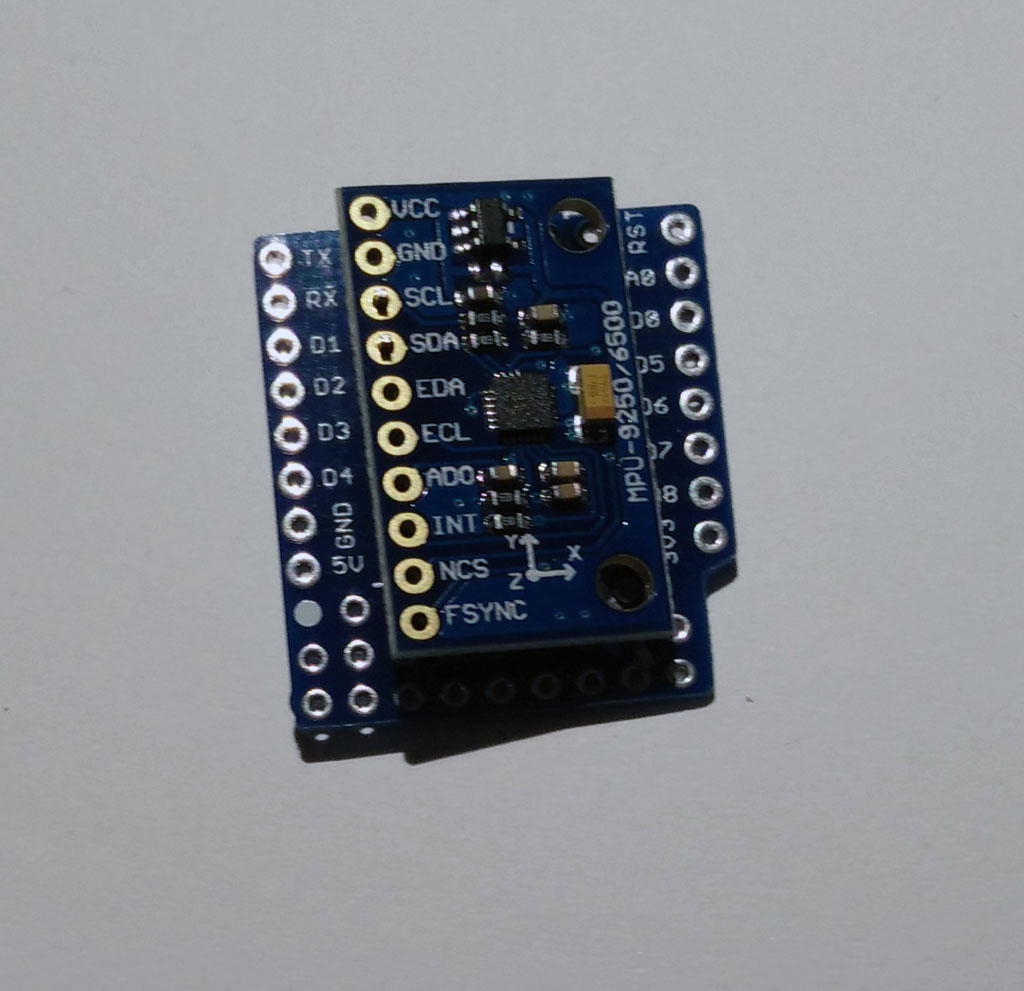
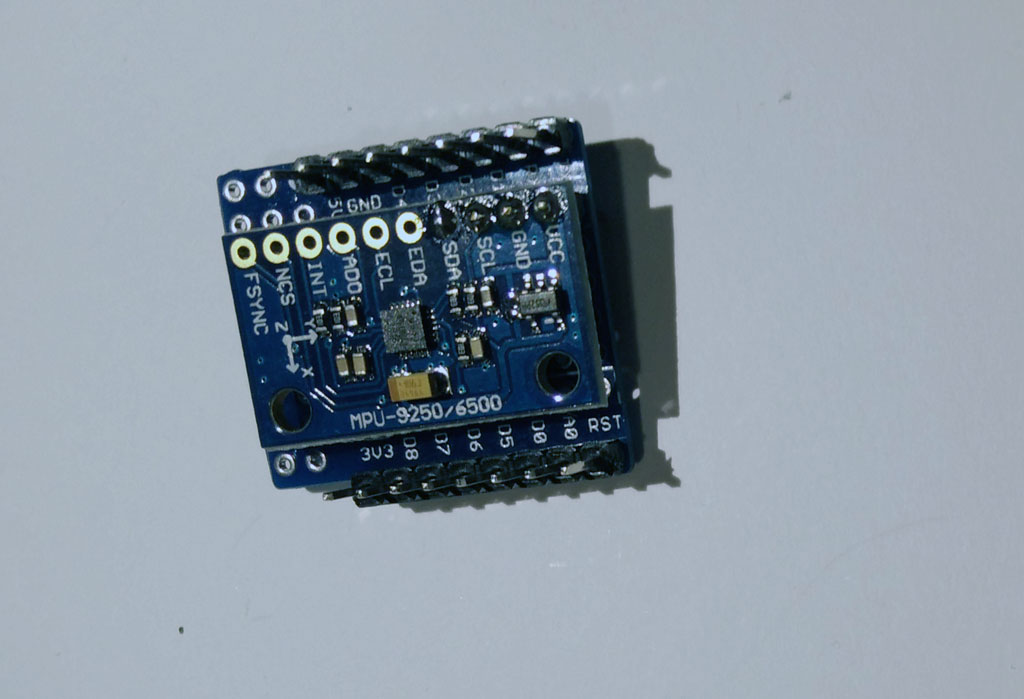
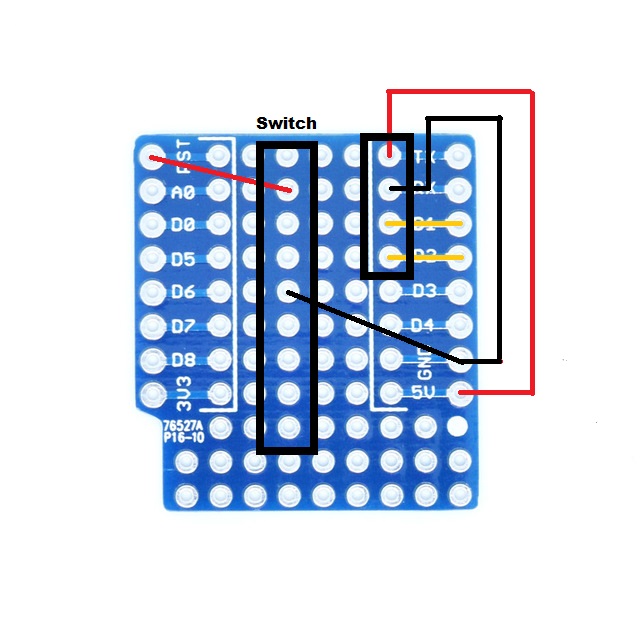
Wemos offers a prototyping board. We use it for mounting the switch and for the MPU9250. Connect the MPU9250 to the bottom side of the prototyping board. Therefore 4 pins have to be soldered

Solder pin (1 row, 4 pins)  on the top side next to TX, RX, D1, D2


Now look at the bottom side of the prototyping board. Put the MPU 9250 so that VCC, GND, SDA, SCL are connected to the pins.

Next, solder the MPU 9250.

Then add more pins to the prototyping board at both sides. The picture shows the bottom side of the prototyping board.

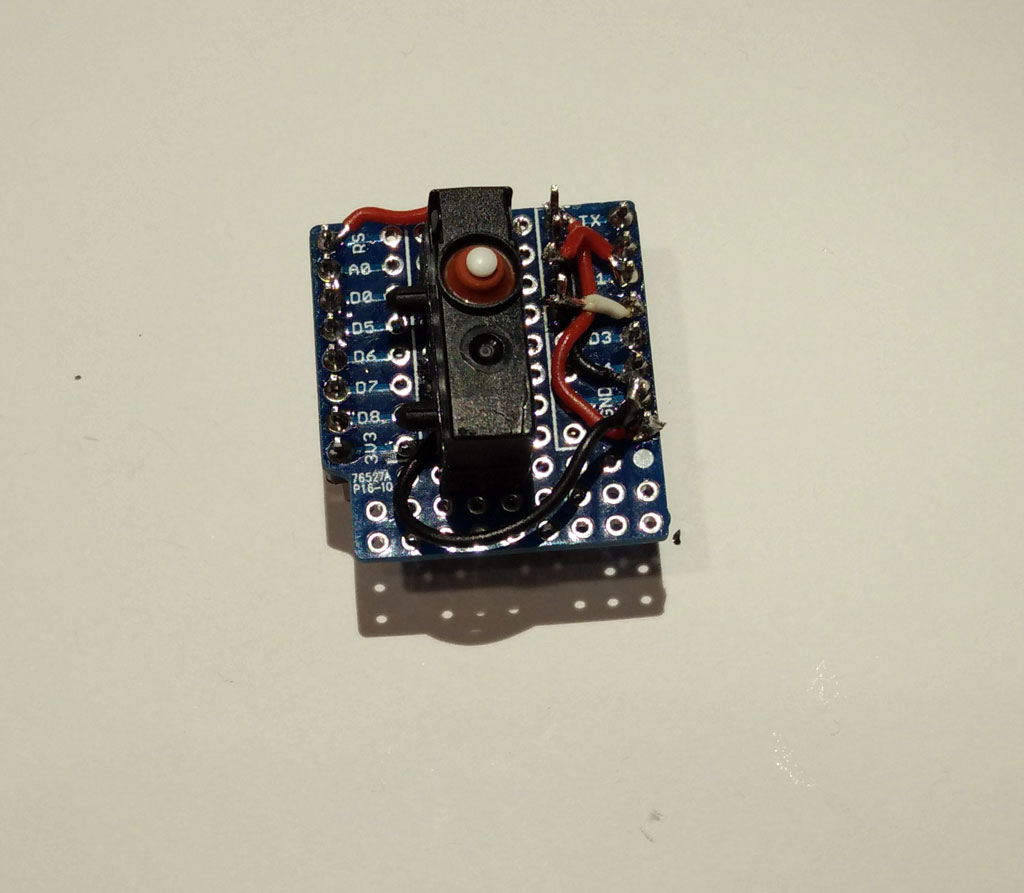
Now wire the prototyping board. The picture shows the top side.

Now you can add the switch. Place it in the middle of the board on the top side. Connect GND and RST to the switch. Now you have a switch for rebooting which can be molded.

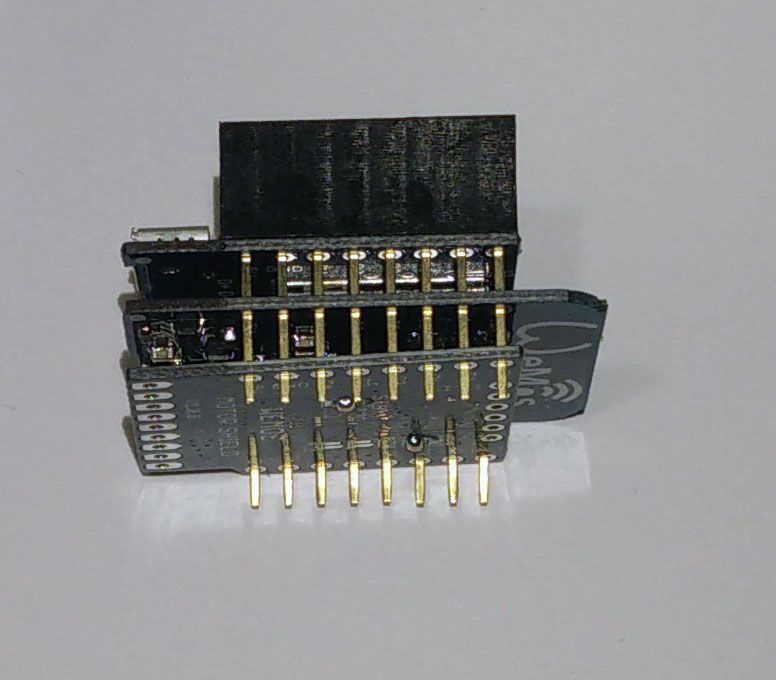
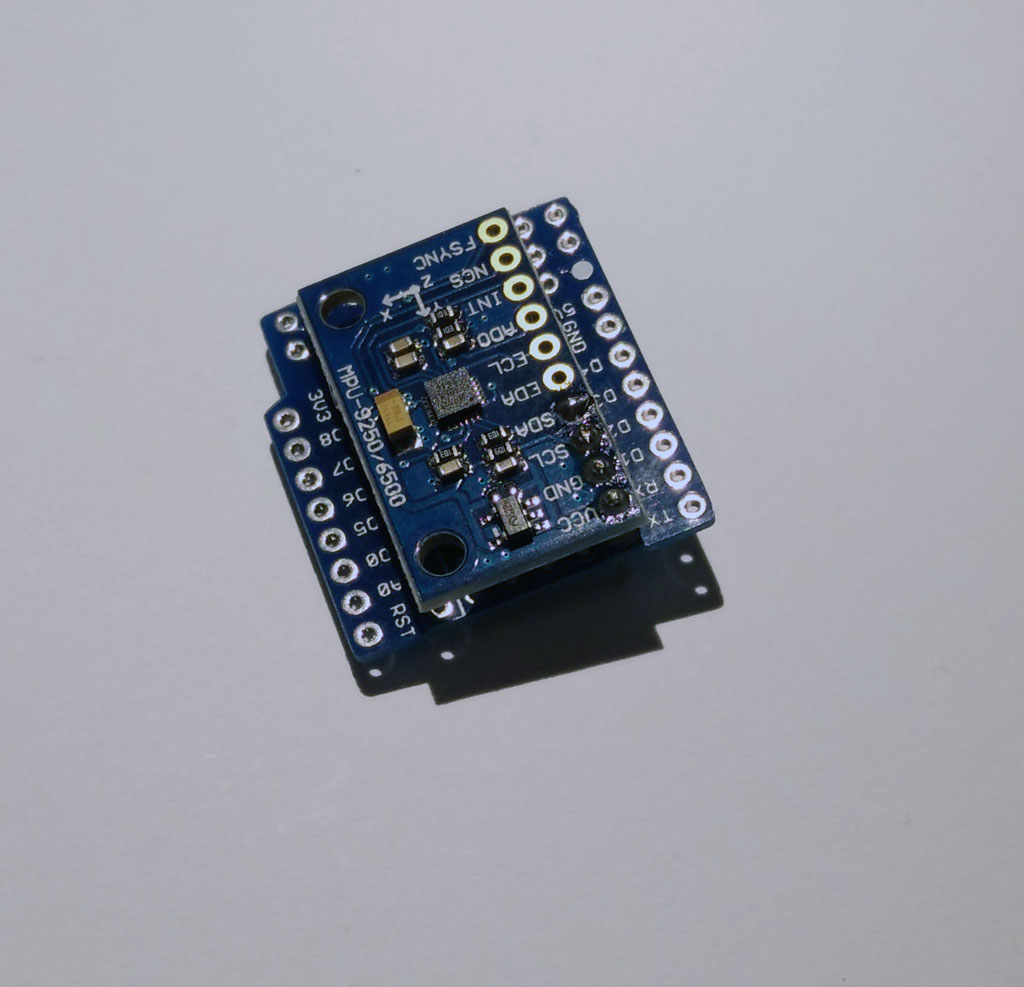
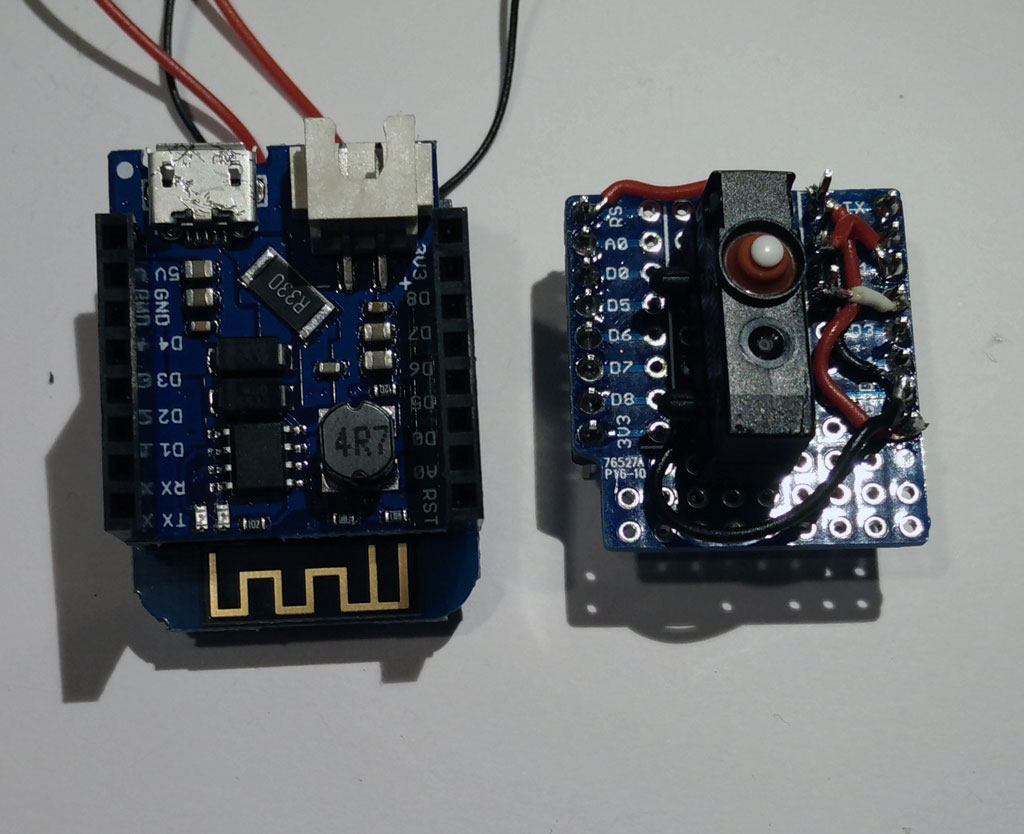
Now we have both parts ready and can stack them together.

Stack them together!

Now add the LiPo battery, which should have a JST header. Now your basic node is ready.

Wireless charging option

Especially for sex toys a wireless charging option is reasonable as this is a requirement for silicone molding of the toy.  And when the toy is molded it is safe and washable.

The wireless charging module consists of a sender (or transmitter module) and a receiver module. You have to solder the receiver module to the battery shield. Don’t mix the modules.

unfortunately there is only  a USB connector. If you don’t want to remove the USB connector you can solder the red (+) wire to the R330 resistor as shown on the pictures. The black (-) wire can be soldered to any pin labeled (GND).

Now put the receiver module on top of the battery module.

Now stack the protoytping board on top of the battery shield.  And connect the battery.To charge the battery connect the sender (or transmitter) module to 5V. To power the sender module you may use a USB port power source which has about 500mAh or more. Place sender and receiver coil about each other.  For a more professional charging solution you need a charging station. The making of a charging station using 3d printing is described here.

Learn how to construct the mold form in part 2:

part 2: Molding the basic node

part 3: Software for the basic node

Internet of (sex) things – part 4: Building a sex toy dashboard with Node-RED

In the fourth part of the tutorial we explain the development of a dashboard for our sex toy.

The series has 4 parts:

part 1: Exploring the internet of (sex) things

part 2: MQTT messages

part 3: Node-RED

part 4: Building a sex toy dashboard with Node-RED

The dashboard is used to visualize certain data eg. the speed of the vibration motor and the movements of the vibrator. In addition it can have some control elements eg. for changing the vibration pattern.

ui-all

The window above is called a tab. You can have multiple tabs. The Motor, Data, Status and Controls – windows are called groups. The Controls – group has buttons to set the motor mode. In addition there is a slider which will set the motor to a constant speed. And there is an on/off button for the LED.

You have to install the Node-RED dashboard. Therefore you need at least version 0.14 of Node-RED. At the time this text was written the standard Node-RED installation is version 0.13 which is not sufficient for the dashboard.

Therefore check your Node-RED version. If it is equal or better than 0.14, skip this step:

  • Download & unzip the latest version from github (eg. https://github.com/node-red/node-red/releases/tag/0.15.2).
  • Now change to newly created directory eg “node-red-0.15.2”
  • On Windows: Start a command shell in adminstration mode
  • Execute “npm install” to install Node-RED.

If your Node-RED version is 0.14 or better install the dashboard:

Some  remarks:

Let’s start and have a look at the new Node-RED interface: On the left side you will find the dashboard or user interface nodes. And on the right side there is new dashboard – tab. It contains all dashboard nodes which are used in the flow ordered hierarchical.

node-red-ui

But where is the dashboard? Just open your browser and go to one of the URLs:

http://localhost:1880/ui/#/0 or
http://127.0.0.1:1880/ui/#/0

How can I get all the flows? You can download all flows here: bi-ui-node-red. Unzip the file and you will get a text file. Open the text file in an editor. Select the text and copy it to the clipboard.

Now we will explain two flows in detail.

Now go the Node-RED window, open the menu (it is on the left top side), select Import -> Clipboard.import1

A new window will open where you can insert the text (CTRL+V). Then press the Import-button.

import2

nodemcu prototype breadboardThe Arduino sketch was updated for the dashboard. Please download the Arduino sketch from here: iost-part4-v12. Unzip the file. Compile and upload to your hardware (see part 1 of the tutorial).


In the first flow we will receive some vibration motor sex toy data which are sent by the MQTT protocol. We will display the data using a gauge and a graph element.

Let’ start with the MQTT input node. There is nothing new. Just connect to the MQTT server and subscribe the topic “BIoutTopic2” – which the sex toy uses to send out data.mqtt-in

Now add the function node “JSON” which will parse the incoming message and places the result in “payload”.

But we want to know the motor speed only. Therefore we need a function node which passes the vibration motor speed as payload and deletes all other data. Please use the following JavaScript code:

get-motor-speed-function-node

To display the speed we need to more nodes. The gauge node gauge-node displays the actual speed. Connect the gauge node with the function node. You can add the range – the minimum and maximum value (0 and 1023).motor-gauge


Now add a chart node chart-nodeand connect it with the function node, too.


Next we want the chart node and the gauge node to be together as shown in the next image.

motor

We have to make a group and put both nodes into the group. Have a look on the dashboard at the right side. Make a new group and move the gauge and chart node below the group called “Motor”.

dashboard-top

slider-nodeNow we explain the second flow. It is used to send commands to the sex toy. We will use a slider to control the speed. But there is one problem: the slider should display the actual speed of the vibration motor. Therefore we manipulate the slider. To display the actual motor speed we have to move the slider appropriate to the actual speed. The slider will be part of the control group:

controls

Now get the slider node and edit the node as follows:

slider-motor-speed

Then connect the node with the “get motor speed” function which was introduced in the first flow.

construct-json-motor-speed-function-nodeFinally comes the trick part. Get a new function node and connect it with the slider. This node will construct the JSON message which will be sent to the sex toy using MQTT. The JavaScript code of the function node is as follows:

function-node-for-constructing-json-speed-command

msg.payload={messageType:"execute", actuator:"motor1",
             actuatorMode:"constant", actuatorValue:msg.payload}
msg.topic = "BIinTopic";
return msg;

Now connect the function node with a new MQTT output node. Leave the topic empty as it will be passed from the input nodes:

mqtt-out-message-to-bi

Using Node-RED with the Node-RED dashboard we are able to make a user interface for our sex toy(s). We could easily display the motion of the sex toy as well as the vibration motor speed. You could argue that we had a (very simple) user interface already in part 1 of the tutorial, without having to use MQTT, Node-RED and the Node-RED dashboard. That’s true. But imagine you have several sex toys and want to control them. You could easily add a tab in Node-RED for each sex toy. Or you could build more sophisticated flows incorporating several sex toy. Why not interconnecting the vibrating necklace with a penis ring and one of the plugs or dildos?

There are a lot of flows and nodes already available at http://flows.nodered.org/. (Of course not in the sex toy domain)

Why not play music for a given sex toy vibrator mode? Or control the sex toy using another IOT device…

Exploring the internet of (sex) things 1

The internet of things – or short IOT – is getting popular. IOT is a network of physical things like vehicles, buildings, but also everyday objects like lamps, refrigerators. IOT allows objects to be sensed and controlled remotely across the Internet. As a result the physical world will be integrated into the internet and computer systems.

Popular examples are home axiomatization or collection of environmental data.  Even sex toy industry use the internet to connect sex toy users which are far away of each other (like the OhMiBod blueMotion). The vision of remote sex driven by technology is also known as Teledildonics. Unfortunately I didn’t pay much attention to this movement which goes back to 1975. body interaction focused more on wireless connected sex toys for users having sex together and want to integrate his and her’s sex toy. You will find a lot of information at Kyle Machulis site Metafetish. Also have a look at the annual conference Arse Elektronika which focus on the intersection of technology and sex.

In this blog I have already shown how to connect the body interaction development board to the internet. Now I will present some first steps into IOT. I will use the NodeMCU development board which is based on the popular ESP8266 System on a chip. The ESP is a wi-fi enabled microcontroller where you can connect sensors and actuators. It can connect to your wi-fi access point and home and it can be an access point itself and host eg. an internet server.

In my explorations I will try to find out if a IOT sex toy is useful for DIY sex toy community.

In this blog post we will use the ESP8266 as a wi-fi server. The server will connect to your wi-fi access point at home.

The series has 4 parts:

part 1: Exploring the internet of (sex) things

part 2: MQTT messages

part 3: Node-RED

part 4: Building a sex toy dashboard with Node-RED

Building a bread board prototype

nodemcu prototype breadboard

Material needed

  • bread board, wires
  • Node MCU or similar
  • small vibration motor (or LED), eg the Lilipad vibration motor
  • optional: accelerometer  MPU9265
  • optional: another LED and a resistor

WIre MPU9265

mpu-92-65Connect

  • SCL (on MPU9265) and D1 (on NodeMCU),
  • SDA and D2,
  • VCC and 3V3
  • GND and GND

Wire vibration motor

Connect

  • D7 (node MCU) with vibration motor (+) and
  • GND (NodeMCU) and (-)

Wire LED

Connect:

  • D3 (NodeMCU) and LED (long end)
  • LED (short end) and resistor
  • resistor and GND (NodeMCU)

Using the Arduino IDE

NodeMCU and all other ESP8266 boards are not supported by Arduino. But you can use the Arduino board manager to add other development boards. This short Tutorial explains the necessary steps: http://www.instructables.com/id/Quick-Start-to-Nodemcu-ESP8266-on-Arduino-IDE/

Connect the NodeMCU to your access point (WLAN router)

Upload script to NodeMCU

Copy the code below to the Arduino IDE or download and unzip this Arduino “.ino” file.

Within the sketch you have to change the constants SSID and password. Use the same SSID as you would do to connect your smart phone or computer to the internet.

Select your NodeMCU and the port. Connect your computer and the NodeMCU with USB wire. Upload the script to NodeMCU

#include <ESP8266WiFi.h>
#include <Wire.h>

#define MPU9250_ADDRESS 0x68
#define MAG_ADDRESS 0x0C

#define GYRO_FULL_SCALE_250_DPS 0x00
#define GYRO_FULL_SCALE_500_DPS 0x08
#define GYRO_FULL_SCALE_1000_DPS 0x10
#define GYRO_FULL_SCALE_2000_DPS 0x18

#define ACC_FULL_SCALE_2_G 0x00
#define ACC_FULL_SCALE_4_G 0x08
#define ACC_FULL_SCALE_8_G 0x10
#define ACC_FULL_SCALE_16_G 0x18

const char* ssid = "????"; // Enter the name of your Access point
const char* password = "????"; //Enter the password SSID
int ledPin = 0; // NodeMCU pad D3 = GPI0
int motorPin= 13; // NodeMCU pad D7 = GPIO 13
double sinusValue=0;

// define constants for four different vibration modes
const int off_mode=0;
const int max_mode =1;
const int sinus_mode =2;
const int motion_mode =3;

int motor_mode =off_mode;

WiFiServer server(80);

 // This function read Nbytes bytes from I2C device at address Address.
// Put read bytes starting at register Register in the Data array.
void I2Cread(uint8_t Address, uint8_t Register, uint8_t Nbytes, uint8_t* Data)
{
 // Set register address
 Wire.beginTransmission(Address);
 Wire.write(Register);
 Wire.endTransmission();

 // Read Nbytes
 Wire.requestFrom(Address, Nbytes);
 uint8_t index=0;
 while (Wire.available())
 Data[index++]=Wire.read();
}

// Write a byte (Data) in device (Address) at register (Register)
void I2CwriteByte(uint8_t Address, uint8_t Register, uint8_t Data)
{
 // Set register address
 Wire.beginTransmission(Address);
 Wire.write(Register);
 Wire.write(Data);
 Wire.endTransmission();
}

void setup() {

 Wire.begin();
 // NodeMCU D1 = GPIO5 connected to MCU9265 SCL
 // NodeMCU D2 = GPIO4 connected to MCU9265 SDA
 Wire.pins(5,4);
 Serial.begin(115200);

 // Configure gyroscope range
 I2CwriteByte(MPU9250_ADDRESS,27,GYRO_FULL_SCALE_2000_DPS);
 // Configure accelerometers range
 I2CwriteByte(MPU9250_ADDRESS,28,ACC_FULL_SCALE_16_G);
 // Set by pass mode for the magnetometers
 I2CwriteByte(MPU9250_ADDRESS,0x37,0x02);

 // Request first magnetometer single measurement
 I2CwriteByte(MAG_ADDRESS,0x0A,0x01);

 Serial.begin(115200);
 delay(10);

 pinMode(ledPin, OUTPUT);
 digitalWrite(ledPin, LOW);

 pinMode(motorPin, OUTPUT);
 analogWrite(motorPin, 0);

 // Connect to WiFi network
 Serial.println();
 Serial.println();
 Serial.print("Connecting to ");
 Serial.println(ssid);

 WiFi.begin(ssid, password);

 while (WiFi.status() != WL_CONNECTED) {
 delay(500);
 Serial.print(".");
 }
 Serial.println("");
 Serial.println("WiFi connected");

 // Start the server
 server.begin();
 Serial.println("Server started");

 // Print the IP address
 Serial.print("Use this URL to connect: ");
 Serial.print("http://");
 Serial.print(WiFi.localIP());
 Serial.println("/");

}

int16_t ax,ay,az,ax1,ay1,az1,gx,gy,gz,gx1,gy1,gz1;
int valueMotor; //vibrator motor speed 0-1023

void loop() {

 // Read accelerometer and gyroscope
 uint8_t Buf[14];
 I2Cread(MPU9250_ADDRESS,0x3B,14,Buf);

 // Create 16 bits values from 8 bits data

 // Accelerometer
 ax=-(Buf[0]<<8 | Buf[1]);
 ay=-(Buf[2]<<8 | Buf[3]);
 az=Buf[4]<<8 | Buf[5];

 // Gyroscope
 gx=-(Buf[8]<<8 | Buf[9]);
 gy=-(Buf[10]<<8 | Buf[11]);
 gz=Buf[12]<<8 | Buf[13];  // when in "motion_mode" the vibration motor 
//is controlled by motion  
if (motor_mode==motion_mode) {  
  int v = 0;  
  //calculate motion vector 
  v=sqrt(pow(ax-ax1,2)+pow(ay-ay1,2)+pow(az-az1,2)); 
 
  // adjust vibration motor speed  
  // if motion vector > 5000 raise speed by 25
  // otherwise lower speed by 10
  // adjust these constants to your needs
  if (v > 5000) {valueMotor=valueMotor+25;} else {valueMotor=valueMotor-10;}
  
  //values must be above 500 otherwise the motor is off 
  if (valueMotor<500) {valueMotor=500;} 
  // values higher than 1023 are not supported
  if (valueMotor>1023) {valueMotor=1023;} 
  analogWrite(motorPin, valueMotor); // set motor speed

  Serial.print("v: ");
  Serial.print(v);
  Serial.print(", valueMotor: ");
  Serial.println(valueMotor);
  delay(200);

  // save values
  ax1=ax;
  ay1=ay;
  az1=az;
  gx1=gx;
  gy1=gy;
  gz1=gz;
 }

 // change vibration motor speed according to a sinus curve
 if (motor_mode==sinus_mode) {
 sinusValue=sinusValue+.01;
 delay(20);
 int sin_tmp = ((sin(sinusValue)+1)*.5*(1023-500))+500;
 Serial.println(sin_tmp);
 analogWrite(motorPin, sin_tmp);
 valueMotor=sin_tmp;
 }

 // Check if a client has connected
 WiFiClient client = server.available();
 if (!client) {
 return;
 }

 // Wait until the client sends some data
 Serial.println("new client");
 while(!client.available()){
 delay(1);
 }

 // Read the first line of the request
 String request = client.readStringUntil('\r');
 Serial.println(request);
 client.flush();

 // Match the request

 int valueLED = LOW;
 if (request.indexOf("/LED=ON") != -1) {
 digitalWrite(ledPin, HIGH);
 valueLED = HIGH;
 }
 if (request.indexOf("/LED=OFF") != -1) {
 digitalWrite(ledPin, LOW);
 valueLED = LOW;
 }

 if (request.indexOf("/MOTOR=MAX") != -1) {
 analogWrite(motorPin, 1023);
 valueMotor = 1023;
 motor_mode=max_mode;
 }
 if (request.indexOf("/MOTOR=OFF") != -1) {
 analogWrite(motorPin, 0);
 valueMotor = 0;
 motor_mode=off_mode;
 }

 if (request.indexOf("/MOTOR=SINUS") != -1) {
 motor_mode=sinus_mode;
 }

 if (request.indexOf("/MOTOR=MOTION") != -1) {
 motor_mode=motion_mode;
 valueMotor=600;
 }

 // Return the response
 client.println("HTTP/1.1 200 OK");
 client.println("Content-Type: text/html");
 client.println(""); // do not forget this one
 client.println("<!DOCTYPE HTML>");
 client.println("<html>");

 client.print("Led pin is now: ");

 if(valueLED == HIGH) {
 client.print("On");
 } else {
 client.print("Off");
 }

 client.print("Motor pin is now: ");
 client.print(valueMotor);

 client.println("");
 client.println("<a href=\"/LED=ON\"\"><button>Turn On </button></a>");
 client.println("<a href=\"/LED=OFF\"\"><button>Turn Off </button></a>");
 client.println("<a href=\"/MOTOR=MAX\"\"><button>Motor Max </button></a>");
 client.println("<a href=\"/MOTOR=OFF\"\"><button>Motor Off </button></a>");
 client.println("<a href=\"/MOTOR=SINUS\"\"><button>Motor sinus curve </button></a>");
 client.println("<a href=\"/MOTOR=MOTION\"\"><button>Motor motion controlled </button></a>");
 client.println("</html>");

 delay(1);
 Serial.println("Client disonnected");
 Serial.println("");

}

Controlling the vibrator prototype

After uploading the script above, open the serial monitor. After some time the NodeMCU will report “wifi connected”.

IOT wifi connectdNow start a browser. Use the URL which the NodeMCU reported eg. http://192.168.1.12/

If your smart phone is connected to the same Access point as your computer is, you can use your smart phone to control the prototype, too.

You can turn the LED on or off by pressing the “Turn On” and “Turn Off” buttons.

For controlling the motor you have 4 options

  • motor on
  • motor off
  • sinus curve (the motor will speed up and slow down according to a sinus curve)
  • motion controlled (more motion -> motor speeds up)

Summary

To build a vibrator prototype based on the ESP8266 MCU is very easy. You can use your Arduino IDE to upload scripts to the prototype. Then you can control the vibration motor through a browser. If you don’t want to use these external control options the vibrator prototype can be controlled by motion similar to the body interaction vibrator development board.

In this blog post series we will  explore other interesting features of the ESP8266:

  • the ESP8266 as an access point (no need for private or public access points)
  • over the air (OTA) uploading of sketches  (wireless – no USB connector needed)
  • MQTT protocol & server
  • Node-RED (visual IOT programming)
  • review of development boards for building IOT vibrators

Go to the second part of the tutorial.

New fusion 3d printed and silicone molded vibrator

fusion tinkercadThis is the initial design. The round curved form will be in silicone with vibration motor within (vibration motor not shown on sketch). The red part is 3d printed. It is the enclosure for the body interaction vibrator development board and LiPo battery. You can plug-in the Micro USB connector for battery charging. In addition there is an on/off switch e.g. for travelling.

Programming Tutorial part 4: Sinus

Nervous Optic by Ben Felten, CC BY-ND 2.0

Nervous Optic by Ben Felten, CC BY-ND 2.0

In tutorial 3 – “ramps” we learned how to repeat instructions again and again using the for statement. In this tutorial we need the for loop again, bur instead of changing the motor speed by a constant value we want a more dynamic behavior. Therefore we use the sinus function – a classical pattern used for controlling vibrators.

Here is a straight forward approach:

for (float i = 0; i < 20000; i = i + 0.05) {
  analogWrite(motor, (sin(i)); //motor speed set to sin(i) 
} 
delay(20); 

We are changing the variable i in small steps of 0.05. So the variable i will become 0, 0.05, 0.1, 0.15, 0,2 … and so on.

But this doesn’t work. Let’s have a look at the sinus function. Just use the google search and type in “sin(x)”. You will see  the following curve:

sin(x) in google

There are two problems:

  • There are values below 0 (on the vertical or y-axis). If the value is 0 or below 0 the motor is off.
  • The maximal value is 1. But  we need values between the minimal motor speed (around 40) and the maximal speed (always 255).

You can try to adjust the function and visualize it with google search. Maybe you will discover an interesting variant of the sinus curve.

We use the following function:

(sin(x)+1) 0.5 * (maximal motor speed – minimal motor speed)) + minimal motor speed

  • Sin(x)+1: add 1 to get positive values only between 0 and 2 instead of -1 and 1.
  • Multiply by 0.5: get values between 0 an 1 instead 0 and 2
  • Multiply with maximal motor speed  (255) – minimal motor speed (40): values are now between 0 and 215
  • Add minimal speed: values are between 40 and 255. So the motor will always be on.


google_sin

This is the script. Please have a look at tutorial 2 if you don’t know how to upload the script.

 // www.bodyinteraction.com tutorial sinus 
int motor = 3; 
int minimal_motorspeed = 50; 

void setup() { 
  pinMode(motor, OUTPUT); 
} 
void loop() { 
  for (float i = 0; i < 20000; i = i + 0.05) { 
    analogWrite(motor, ((sin(i) + 1) * 0.5 * 215) + 40); 
    delay(5); 
  } 
} 

If you want to slow down the changes in the motor speed change delay(5) and take larger values.

Go back to tutorial 3: ramps

Vibrating 3d Printed Necklace

necklace-frontThere are a lot of sensible areas of the body which are also erogenous zones (see Wikipedia). The neck is one of them. Stimulation can be achieved eg. by licking and kissing. The stimulation can be quite strong. So why not try to stimulate your neck with vibration? We think it works.

Think of an artistic designed necklace or collar with a vibration function. The vibration will be turned on when you move and gets more intense when you shake our head eg. while dancing. Or the vibration function will be turned on remotely by your friend.

necklace tinkercadBody interaction has made a 3d design for a vibrating necklace. It can be secured by a solid clip closure at the back of the neck. At this place the vibration motor is positioned which gives an intense vibration especially at the back of the neck but also at the whole neck.

closure-back-2


necklace-circuitsThe body interaction vibrator development board is inserted into the collar. It controls the vibration motor. The more you move the more it vibrates. There is also place for the battery. Wires and boards can be hidden. Unhidden it has a scifi look-alike.


closure-topIn the front there is a solid but easy to close hook closure.


Download 3d files from Thingiverse and print it.

Get the vibrating electronics from Tindie.

Edit and design your own with Tinkercad https://tinkercad.com/things/8stCwczMAkp

necklace-bird

Programming the body interaction 1 (BI) – part 1

Controlling the vibration motor

The vibration motor is an analog device. You can control the vibration on a scale between 0 and 255. If you set the vibration to 0 the motor is off, if you set the vibration to 255 the motor will be at full speed.

Good vibrations Tokyo by Kevin Dooley, CC BY 2.0

Good vibrations Tokyo by Kevin Dooley, CC BY 2.0

The motor is connected to a pin of the controller (“ATtiny84”), the heart of the BI. Every pin has a number and the motor is always connected to pin 3.

on off chartNow we can start with the first script (or program). The script will set the motor to full speed for one second. Then the motor will be off for 1 second. And this will be repeated infinite.


Here is the complete script:

int motor=3;
void setup() {
  pinMode(motor, OUTPUT);
}

void loop() {
  analogWrite(motor, 255); //motor on
  delay(1000);  // wait for 1 second
  analogWrite(motor, 0); //motor off
  delay(1000);
}

Now the script is explained line by line:

int motor=3;

First we declare a variable called “motor” and assign the value 3. The variable is of type int (integer) which is used to store a number. Now we could use “motor” instead of “3” whenever we want to control the vibration motor – this will help us to understand and debug our script.

void setup() {
  …
}

This is function which is part of every Arduino script. It is called setup and well be executed at first and only once.

pinMode(motor, OUTPUT);

Each pin can be in INPUT or OUTPUT mode. In input mode sensor data can read, in output mode a motor or a LED can be controlled. We set the motor pin to OUTPUT.

void loop() {
  …
}

In the function loop we put all the instructions which should be carried out. When all instructions are done the script doesn’t stop but starts again. Therefore the loop will be repeated infinite.

analogWrite(motor, 255);

The motor is set to full speed (255).

delay(1000);

The delay function stops all processing for 1000 milliseconds. 1000 millisecond are 1 second.

analogWrite(motor, 0);

Then motor is set off (0). In the second part of the tutorial uploading of the script to the body interaction 1 is explained.

More:

https://www.arduino.cc/en/Tutorial/Foundations

Read part 2: the accelerometer