
Readers ask me for an easy way to control the body interaction vibrator development board. Without or with limited programming knowledge, without complicated Internet of thing technology, like the visual programming tool NODERED or the MQTT protocol and server.
 That’s what Blynk is for. Started in 2016 as a kickstarter campaign, they have built a tool which hides a lot of the complexity of the Internet of Things. Blynk consists of the following parts:
Blynk app. With this app you can build a User Interface in just a few minutes. You have all the usual elements like switches, slider, graphs and much more for controlling IOT devices.
Blynk Server / Cloud is responsible for the communications between the smart phone and IOT devices. There is nothing to do, everything works in the background
IOT devices library: So far everything is very simple. But at the end you have to program your IOT device – the body interaction 2 board for example. They support a great number of boards. For this they created the blynk library – with the library you need only some lines of code which must be uploaded to the board. Even when you change the user interface the code can stay the same. At least for simple changes. They offer a code generator where you code for your board and use case is generated automatically.
You find a lot of information in the Internet about the pros and cons. In short: It is easy compared to other tools, but if you want to implement your own algorithms programming knowledge is needed. Blynk limits the number of free User Interface elements. If you need more you have to pay a small fee.
Here is short tutorial to run you BI2 with Blynk. (takes 30 minutes)
Download the Blynk app (Android or iPhone).
Within the Blynk app: Register for Blynk and get AUTHenitfication code.
Upload Arduino
You can download Arduino from the Arduino Website or from the Microsoft Store (Windows only)
Add or update the following libraries with the library manager: FastLED and Blynk.
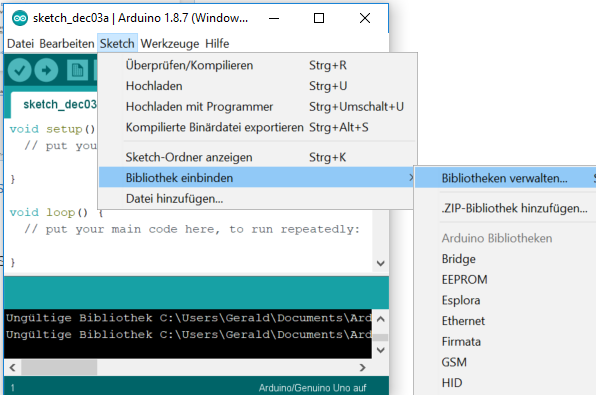
Select Include libraries -> library manager

Search for FastLED and install this library (press install button).

Now search for “Blynk” and install the Blynk software. However Blynk suggests to install the Blynk app manually.
Add board definition for the ESP8266
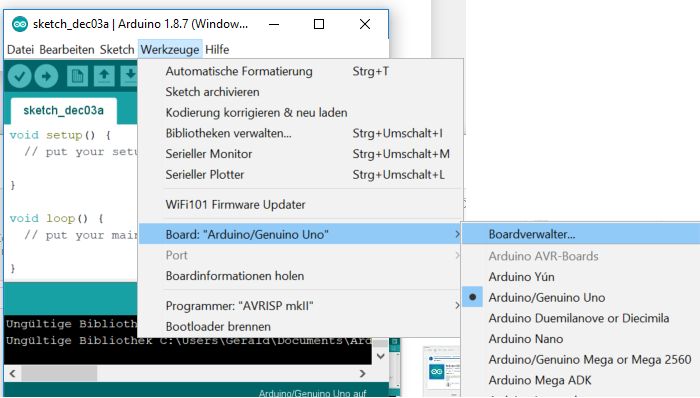
Select Tools -> Board -> Board management
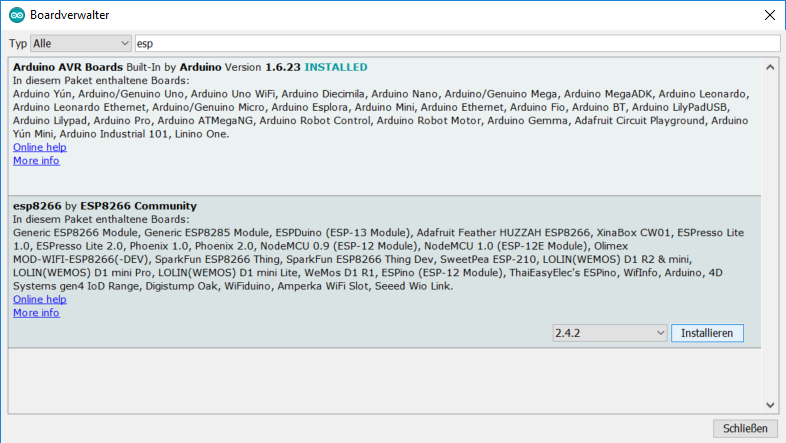
Search for ESP and install “esp8266”
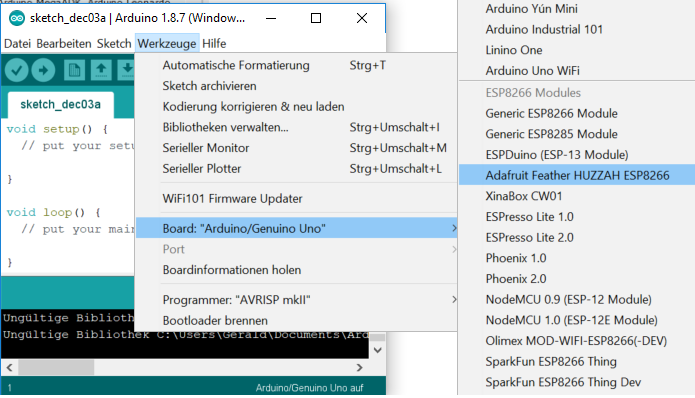
Select Board -> Adafruit Feather
Build a connection between BI2 and your computer.
First download the USB driver from here and install the driver. Connect the BI2 with your computer. After some while windows will notice a new device. Windows will communicate with the board over a COM port (e.g. COM3). If you have any problemes check your USB wire. It must support all lines, not only + and – for charging.
Now go back to Arduino and select Tools -> Port. Select the new COM port
Compile and upload the code to BI2 board
Now copy and paste the following code in a Arduino sketch (use File -> new). Then press the Upload button.
/*************************************************************
Controling the body interaction 2 board with the Blynk app
*/

#define BLYNK_PRINT Serial
#include <ESP8266WiFi.h>
#include <BlynkSimpleEsp8266.h>

// Auth Token infor the Blynk App.
char auth[] = "XXXXXXXXXXXXXXXXXXXXXXXXXXX";

// Your WiFi credentials.
char ssid[] = "XXXXXXXX";
char pass[] = "XXXXXXXX";

// Library for controlling the WS2821B (Neopixel) LED or LED strip
#include "FastLED.h"
#define NUM_LEDS 1 // number of LEDs
#define DATA_PIN 14 // pin for LED
CRGB leds[NUM_LEDS]; // define the array of leds

// This function set the LED color according to the selected RGB values in the app.
// RGB values are controlled in the app with zeRGBa widget
// values are stored in the virtual pin V0
// V0 consists of 3 values for Red, Green, Blue
BLYNK_WRITE(V0) // set LED RGB color values
{
  int i = param[0].asInt();
  int j = param[1].asInt();
  int k = param[2].asInt();
  leds[0].setRGB(j,i,k);
  FastLED.show();
}

void setup()
{
  // init LEDs
  FastLED.addLeds<WS2812B, DATA_PIN, RGB>(leds, NUM_LEDS);

  // connect to Blynk
  Blynk.begin(auth, ssid, pass);
}

void loop()
{
  Blynk.run();
}
You have to change AUTH. Use the AUTH code / token that was sent to you during Blynk registration. Then you have to change the WLAN credentials. Use the name of your network (SSID) and its password. (Depending on the maximum voltage of the vibration motor you have to adjust i, j and k e.g. for a 1.5V motor divide the variables by 3.
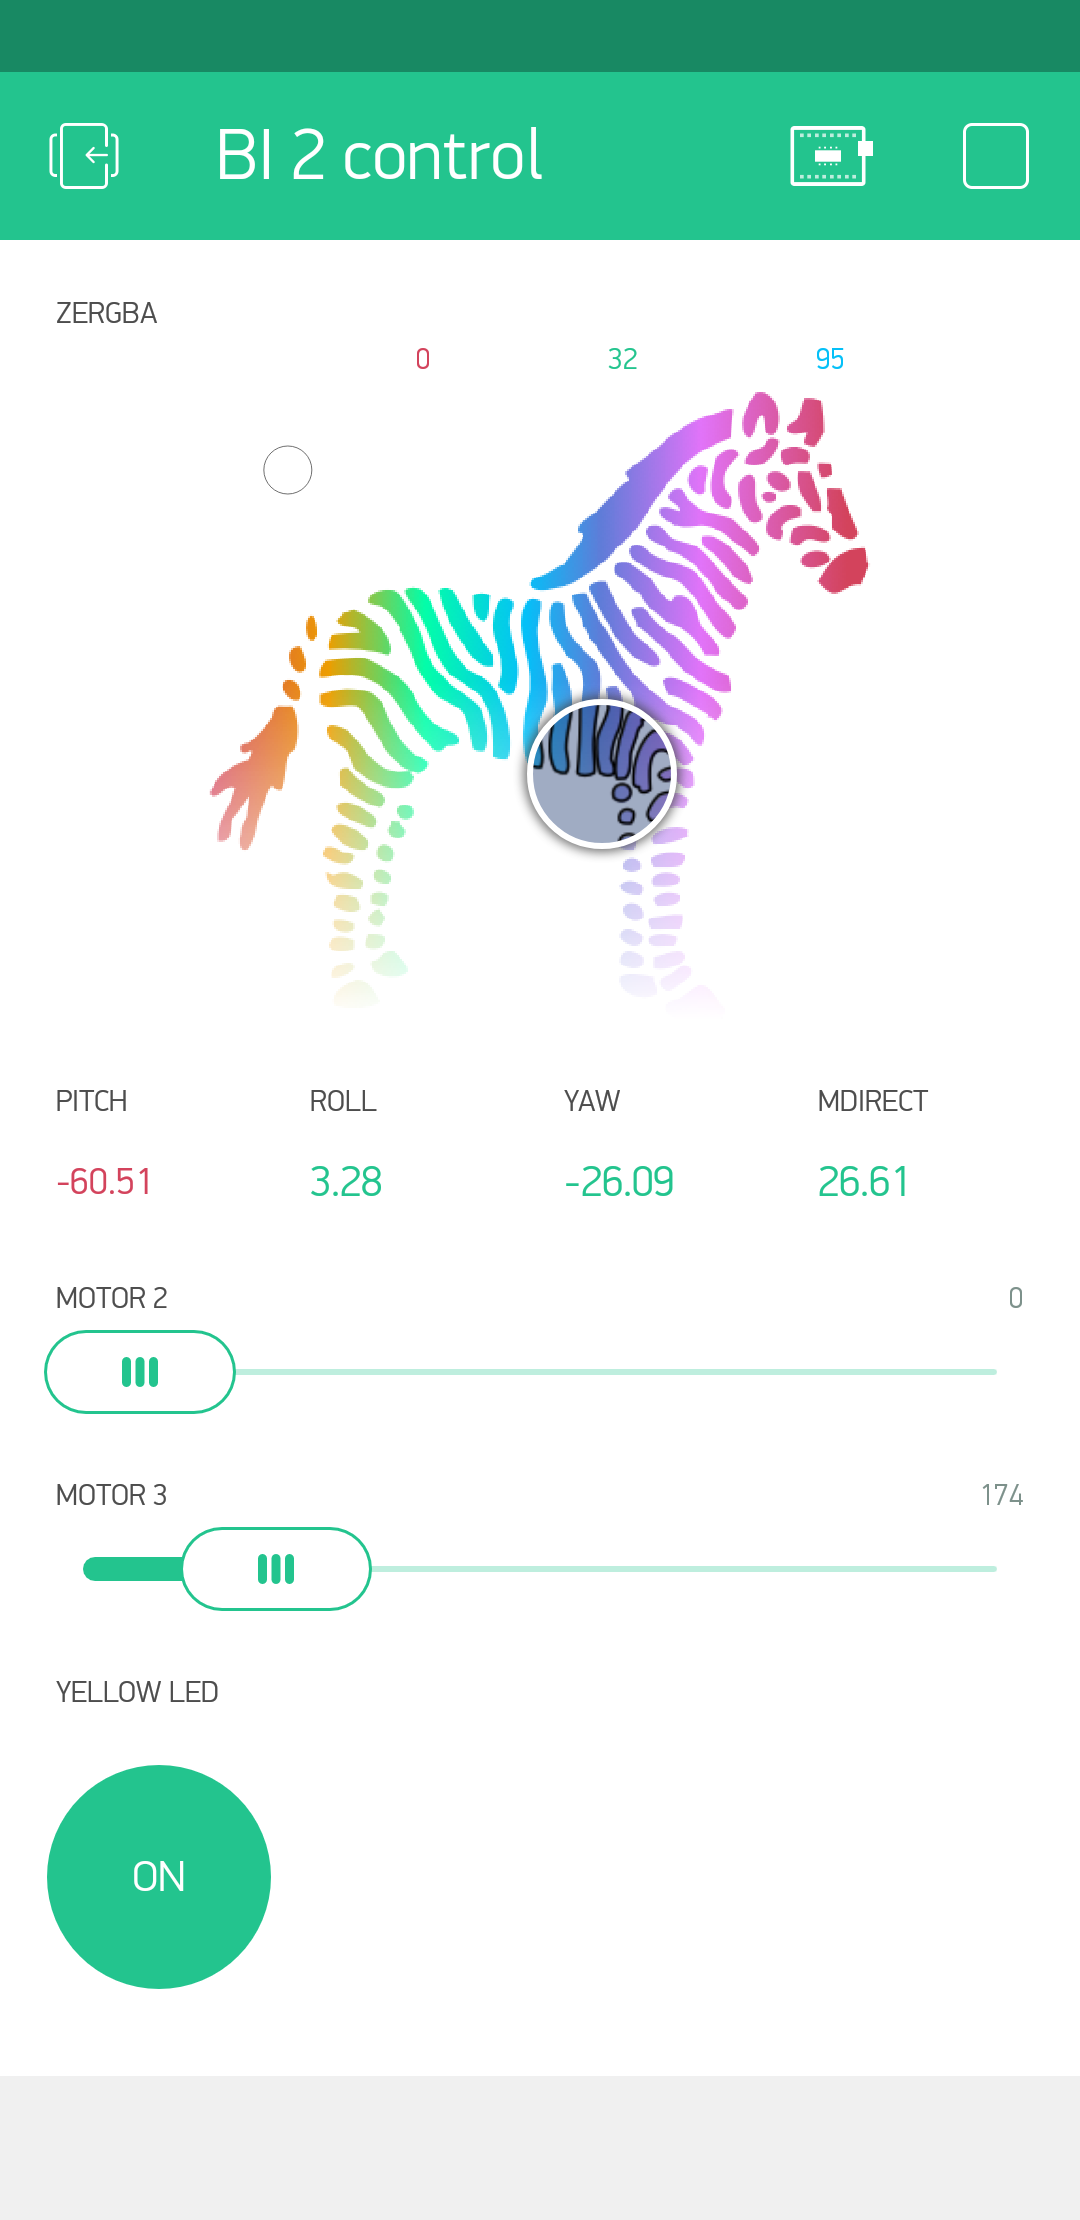
Configure the Blynk app
Create a new project and choose this device: ESP8266. Now add user interface elements – they are called widgets -to control the BI2. You can move and resize, add and delete each widget. Press on the widget to enter parameters like GPIO port etc. The app could look like that but you may position the widgets as you like. [The pitch, roll, yaw text fields can be omitted. They are introduced later.]


Add the following Widgets
Press the “+” button and add this widget:
zeRGBA: With this tool you can control the WS2821B LED
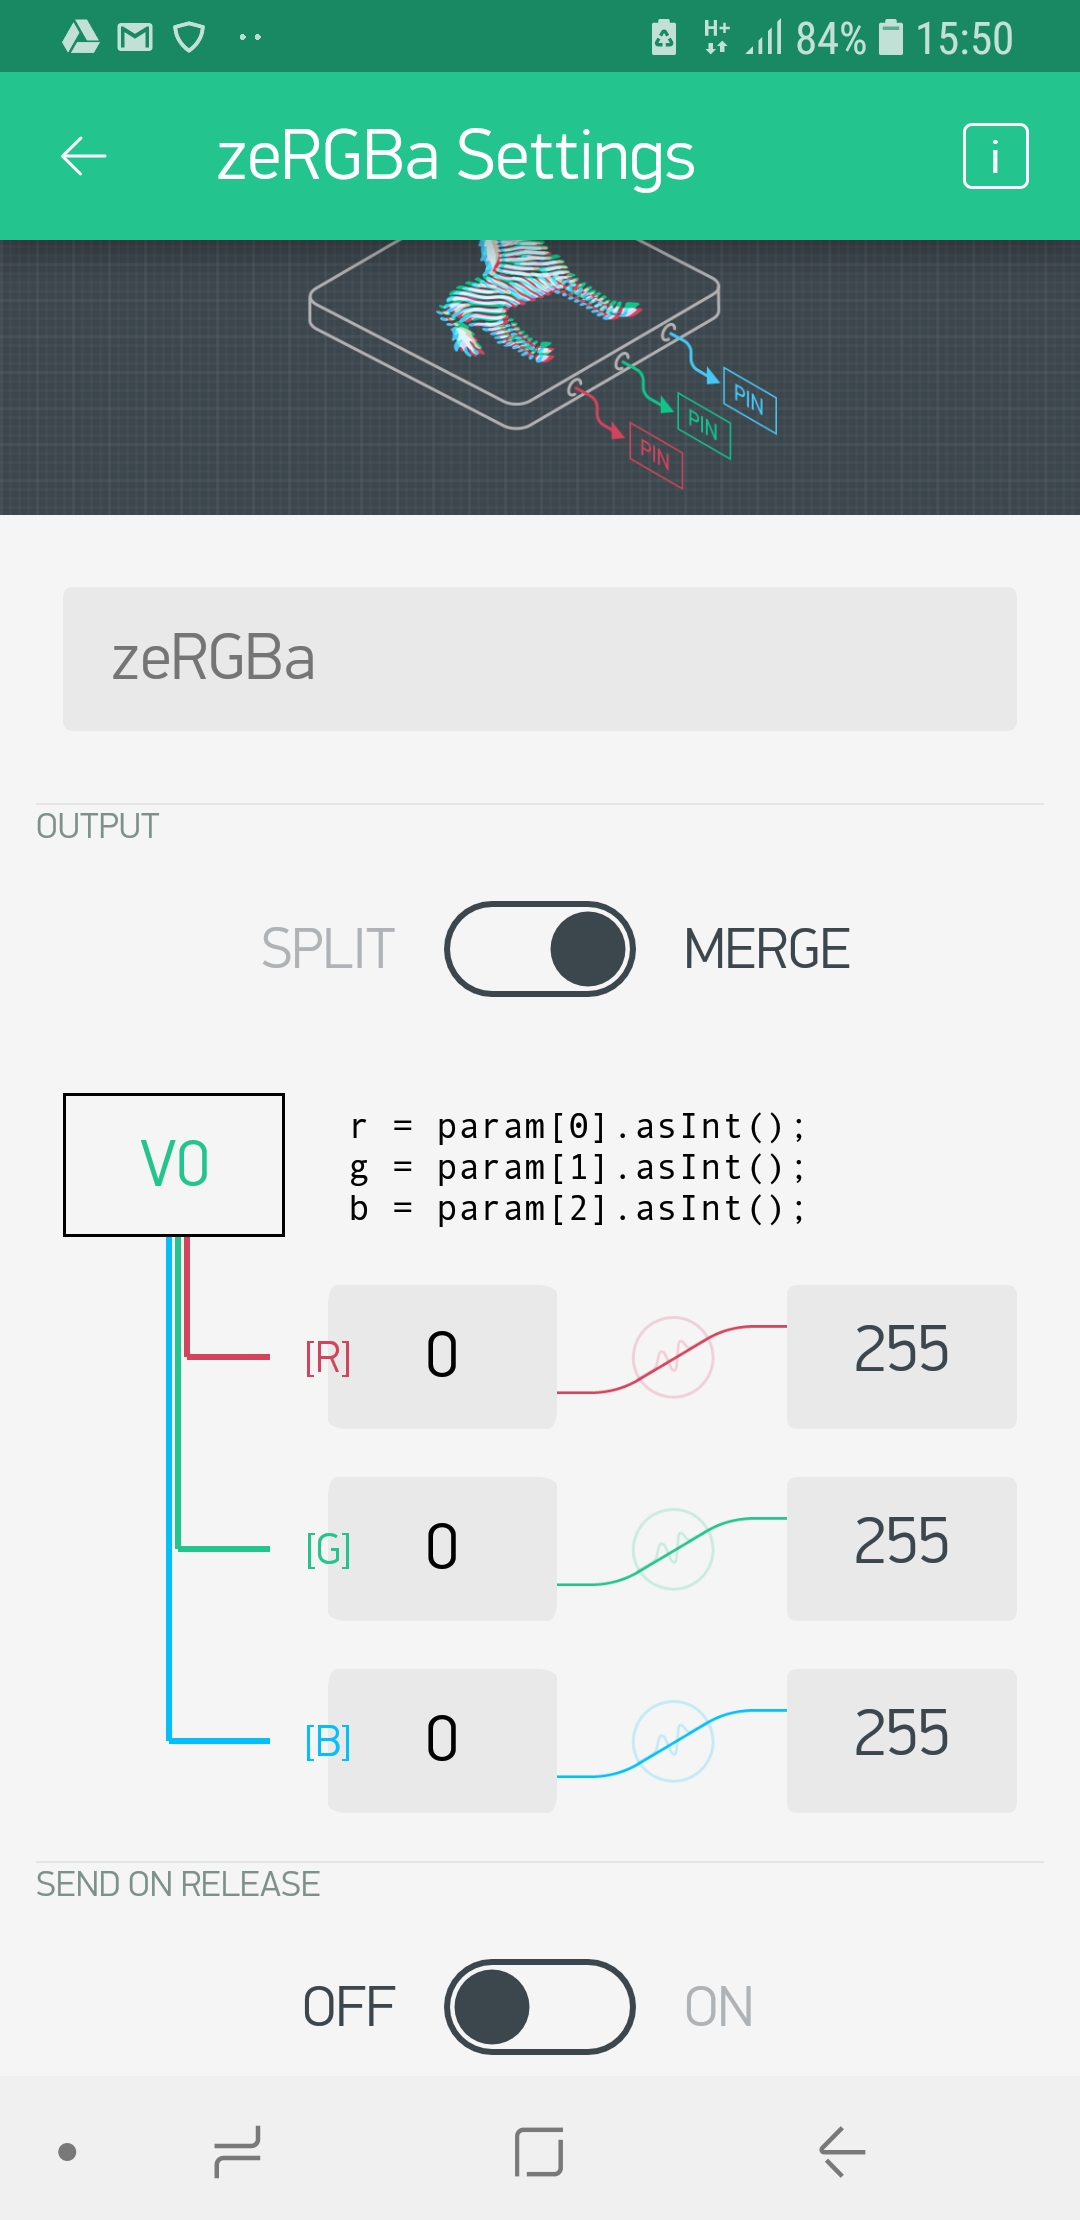
Choose select pin V0 = Virtual Pin 0.
Choose Merge.
Send on release: off
Add Sliders
Press the “+” button and add two sliders, one for each motor.
1st silder: Select Digital Pin 12 (PWM)
2nd slider: Select Digital Pin 13 (PWM)
Add Button
Press the “+” button and add the button widget. Select pin digital – gp0. Set mode to “switch”.

Start the app
Therefore press the Run (or play) button (top left).
Done!
Questions? Reply to this post, via wordpress or to jacardano@gmail.co

One thought on “Blynk: Controlling BI2 from the smartphone”